Reference version

This documentation is available as Markdown for AI agents and LLMs. See the full Markdown index or append .md to any documentation URL.

ContextMenu

用于显示上下文菜单的 SwiftUI ContextMenu 组件。

iOS
tvOS
Included in Expo Go
Recommended version:
~58.0.1

Expo UI ContextMenu 与官方 SwiftUI contextMenu API 相匹配,并在长按时显示菜单。对于单击菜单交互,请改用 Menu。

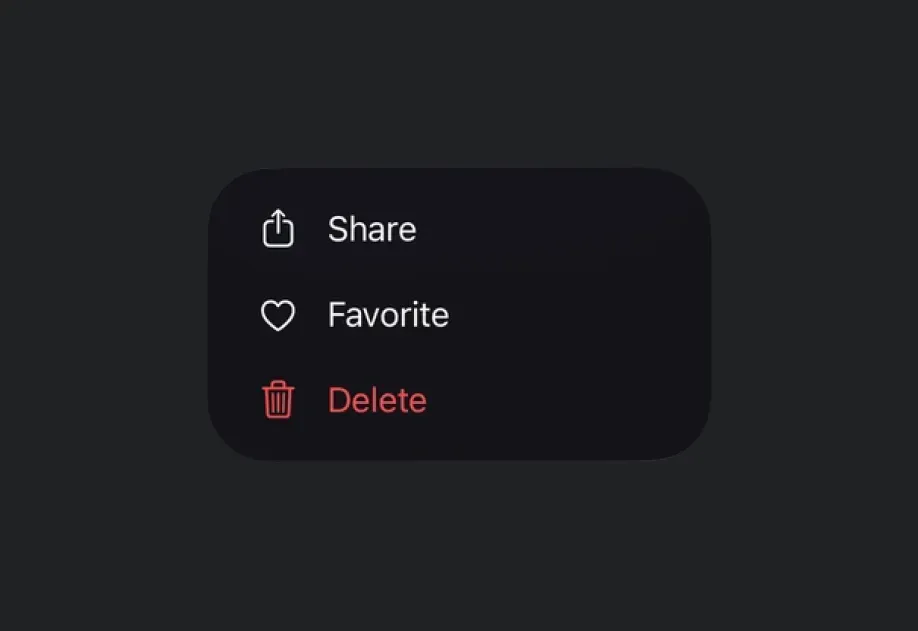
长按一个图块后,它会显示为放大的预览,下方有一个包含 Share、Favorite、Delete 的菜单长按一个图块后,它会显示为放大的预览,下方有一个包含 Share、Favorite、Delete 的菜单

安装

Terminal
- npx expo install @expo/ui
- yarn expo install @expo/ui
- pnpm expo install @expo/ui
- bun expo install @expo/ui

If you are installing this in an existing React Native app, make sure to install expo in your project.

用法

基础上下文菜单

BasicContextMenuExample.tsx
import { Host, ContextMenu, Button, Text } from '@expo/ui/swift-ui'; export default function BasicContextMenuExample() { return ( <Host style={{ flex: 1 }}> <ContextMenu> <ContextMenu.Items> <Button label="Edit" onPress={() => console.log('Edit')} /> <Button label="Delete" role="destructive" onPress={() => console.log('Delete')} /> </ContextMenu.Items> <ContextMenu.Trigger> <Text>Long press me</Text> </ContextMenu.Trigger> </ContextMenu> </Host> ); }

带系统图像的上下文菜单

ContextMenuWithImagesExample.tsx
import { Host, ContextMenu, Button, Text } from '@expo/ui/swift-ui'; export default function ContextMenuWithImagesExample() { return ( <Host style={{ flex: 1 }}> <ContextMenu> <ContextMenu.Items> <Button label="Share" systemImage="square.and.arrow.up" onPress={() => console.log('Share')} /> <Button label="Favorite" systemImage="heart" onPress={() => console.log('Favorite')} /> <Button label="Delete" systemImage="trash" role="destructive" onPress={() => console.log('Delete')} /> </ContextMenu.Items> <ContextMenu.Trigger> <Text>Long press me</Text> </ContextMenu.Trigger> </ContextMenu> </Host> ); }

带预览的上下文菜单

使用 ContextMenu.Preview 可在菜单打开时于其上方显示自定义预览。

ContextMenuWithPreviewExample.tsx
import { View, Text as RNText } from 'react-native'; import { Host, ContextMenu, Button, RNHostView, Text, } from '@expo/ui/swift-ui'; export default function ContextMenuWithPreviewExample() { return ( <Host style={{ flex: 1 }}> <ContextMenu> <ContextMenu.Items> <Button label="Edit" onPress={() => console.log('Edit')} /> <Button label="Delete" role="destructive" onPress={() => console.log('Delete')} /> </ContextMenu.Items> <ContextMenu.Trigger> <Text>Long press me</Text> </ContextMenu.Trigger> <ContextMenu.Preview> <RNHostView matchContents> <View style={{ width: 200, height: 100, backgroundColor: '#f0f0f0', padding: 16, }}> <RNText>Preview content</RNText> </View> </RNHostView> </ContextMenu.Preview> </ContextMenu> </Host> ); }

带选择器的上下文菜单

ContextMenuWithPickerExample.tsx
import { useState } from 'react'; import { Host, ContextMenu, Button, Text, Picker, } from '@expo/ui/swift-ui'; import { pickerStyle, tag } from '@expo/ui/swift-ui/modifiers'; export default function ContextMenuWithPickerExample() { const [selectedIndex, setSelectedIndex] = useState< number | undefined >(0); return ( <Host style={{ flex: 1 }}> <ContextMenu> <ContextMenu.Items> <Button label="Action" onPress={() => console.log('Action')} /> <Picker label="Size" modifiers={[pickerStyle('menu')]} selection={selectedIndex} onSelectionChange={setSelectedIndex}> {['Small', 'Medium', 'Large'].map((option, index) => ( <Text key={index} modifiers={[tag(index)]}> {option} </Text> ))} </Picker> </ContextMenu.Items> <ContextMenu.Trigger> <Text>Long press me</Text> </ContextMenu.Trigger> </ContextMenu> </Host> ); }

带分区的上下文菜单

使用 Section 和 Divider 组件对菜单项进行分组。

ContextMenuWithSectionsExample.tsx
import { Host, ContextMenu, Button, Text, Section, Divider, } from '@expo/ui/swift-ui'; export default function ContextMenuWithSectionsExample() { return ( <Host style={{ flex: 1 }}> <ContextMenu> <ContextMenu.Items> <Section title="Actions"> <Button label="Edit" onPress={() => console.log('Edit')} /> <Button label="Duplicate" onPress={() => console.log('Duplicate')} /> </Section> <Divider /> <Button label="Delete" role="destructive" onPress={() => console.log('Delete')} /> </ContextMenu.Items> <ContextMenu.Trigger> <Text>Long press me</Text> </ContextMenu.Trigger> </ContextMenu> </Host> ); }

禁用的菜单项

在菜单 Button 上使用 disabled(true) 修饰符,可将其显示为灰色且不可交互。

DisabledContextMenuItemExample.tsx
import { Host, ContextMenu, Button, Text } from '@expo/ui/swift-ui'; import { disabled } from '@expo/ui/swift-ui/modifiers'; export default function DisabledContextMenuItemExample() { return ( <Host style={{ flex: 1 }}> <ContextMenu> <ContextMenu.Items> <Button label="Edit" onPress={() => console.log('Edit')} /> <Button label="Locked" systemImage="lock" modifiers={[disabled(true)]} onPress={() => console.log('This never fires')} /> </ContextMenu.Items> <ContextMenu.Trigger> <Text>Long press me</Text> </ContextMenu.Trigger> </ContextMenu> </Host> ); }

可选菜单项(勾选标记)

ContextMenu.Items 中的 SwiftUI Toggle 在 isOn 为 true 时,会自动显示为一行,左侧带有 SF Symbol,右侧带有勾选标记。

CheckmarkContextMenuItemExample.tsx
import { Host, ContextMenu, Toggle, Text } from '@expo/ui/swift-ui'; import { useState } from 'react'; export default function CheckmarkContextMenuItemExample() { const [pinned, setPinned] = useState(false); return ( <Host style={{ flex: 1 }}> <ContextMenu> <ContextMenu.Items> <Toggle isOn={pinned} label="Pin" systemImage="pin" onIsOnChange={setPinned} /> </ContextMenu.Items> <ContextMenu.Trigger> <Text>Long press me</Text> </ContextMenu.Trigger> </ContextMenu> </Host> ); }

嵌套上下文菜单

使用嵌套的 ContextMenu 组件创建子菜单。

NestedContextMenuExample.tsx
import { Host, ContextMenu, Button, Text } from '@expo/ui/swift-ui'; export default function NestedContextMenuExample() { return ( <Host style={{ flex: 1 }}> <ContextMenu> <ContextMenu.Items> <Button label="Action" onPress={() => console.log('Action')} /> <ContextMenu> <ContextMenu.Items> <Button label="Sub Action 1" onPress={() => console.log('Sub 1')} /> <Button label="Sub Action 2" onPress={() => console.log('Sub 2')} /> </ContextMenu.Items> <ContextMenu.Trigger> <Button label="More Options" /> </ContextMenu.Trigger> </ContextMenu> </ContextMenu.Items> <ContextMenu.Trigger> <Text>Long press me</Text> </ContextMenu.Trigger> </ContextMenu> </Host> ); }

API

import { ContextMenu } from '@expo/ui/swift-ui';

Components

ContextMenu

iOS
tvOS

Type: React.Element<ContextMenuProps>

ContextMenu allows you to create a context menu, which can be used to provide additional options to the user.

Props of the ContextMenu component.

ContextMenuProps

children

iOS
tvOS
Type: ReactNode

The contents of the context menu. Should include ContextMenu.Trigger, ContextMenu.Items, and optionally ContextMenu.Preview.

Items

iOS
tvOS

Type: React.Element<{ children: ReactNode }>

Items visible inside the context menu. It could be Section, Divider, Button, Toggle, Picker or even ContextMenu itself for nested menus. Remember to use components from the @expo/ui/swift-ui library.

Preview

iOS
tvOS

Type: React.Element<{ children: ReactNode }>

The component visible above the menu when it is opened.

Trigger

iOS
tvOS

Type: React.Element<{ children: ReactNode }>

The component visible all the time that triggers the context menu when long-pressed.